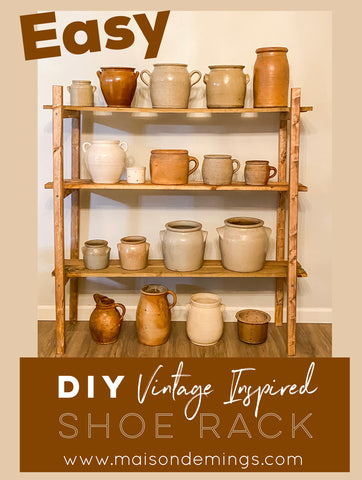
This Vintage Inspired Rack is one of my new favorite pieces! I had been looking for a small rack to store my French pottery for several months and couldn't find anything. A lot of times, that's how my DIY ideas come to life. If I can't find what I'm looking for, I make it!
Can you believe I achieved the same vintage look for under $20?? DIY's don't have to be complicated - this is something I created myself within an hour. Trust me, if I can do it - so can you!! You can use scrap wood you have on hand like I did, or pick up a few pieces at your local hardware store. I absolutely love how it turned out.
Supplies Needed:
-
Electric chop saw
-
Electric drill
-
#2 Phillips 2" power bit
-
5/32 inch drill bit
-
(12) 1 1/2" screws
-
(12) 2" screws
-
(3) 8 foot pine 2x2 inch boards
-
(6) 4 foot pine 1x4 inch boards
-
Pencil
-
Tape measure
-
Stain (we prefer Minwax with equal parts Provincial/Fruitwood)
-
Optional: Set of 4 Solid Brass Stem Casters
 Steps:
Step 1: Measure and cut materials to size using an electric chop saw
-
Cut 2x2 inch pine into 6 pieces measuring 1 foot for depth
-
Cut 2x2 inch pine into 4 pieces for 4 foot tall posts for main frame
-
Cut 1x4 inch pine into 6 pieces measuring 4 feet in length
Step 2: Marking measurements
On each of the 4 foot length 2x2 inch pine boards, use a pencil to mark the center at 4 inches, 18 inches and 34 inches. This will determine the shelf heights for your rack. I created 3 shelfs using those dimensions, but you can get creative here. You’ll use these marks to determine where to drill pilot holes.
Step 3: Framing the side sections
Start by drilling pilot holes at the center of your 4, 18 and 34 inch marks on each of the 2x2 boards. You should have 12 pilot holes in total.
Beginner's Tip: Drilling a pilot hole not only guides the screw into the hole with ease, but it's a lot easier to drive in a screw whether you are using a power drill or screwdriver. Without a pilot hole, it is possible you could split or crack the wood.

Center the 1 foot 2x2 inch pine board on the bottom marks you made and attach it to the 4 foot 2x2 inch posts with 2" screws. Be sure to align the 1 foot 2x2 inch pine boards as you go and make sure they sit securely in their holes and are straight. Repeat process for all sides.

Step 4: Attach the shelves
Center and attach 1x4 inch pine boards to the top of your 1 foot sides. Drill a pilot hole on the top of the 1x4 pine boards and secure with your 1 1/2 inch screws. I left a 3 inch overhang on the sides as shown below.

Repeat process for all 1x4 inch boards.

Step 5: Stain and finish
With the rack securely constructed, finish in your choice of stain.

Be sure to allow adequate drying time before moving indoors. Style and enjoy!

This rack is perfect for displaying my French vintage pottery collection! If you make your own DIY Vintage Inspired Shoe Rack, be sure to tag me at @maisondemings so I can share!!

Amy, I messaged you via Instagram. You need cross bracing on these shelves to stop the sideways movement. Right now the screws are the only thing holding it upright. With all the weight of the pottery, it might only take a sideways accidental bump by a person or animal causing it to flex sideways and crash and broken pottery. Post your upgrade for your readers.
Blessings, Wyatt