

This post is sponsored by Ceilume. All opinions are 100% my own. Thank you for supporting the brands we truly love!
When we purchased our home, it came with a bonus room adjacent to the garage which the previous owner used to host local poker tournaments. It is a large space (700 square feet) and after moving 5x in 5 years, it was the perfect catch-all room for us. About a year into living in Southern Illinois, I finally gave the room some attention and painted the walls so I could utilize it as a workshop and craft room. When COVID-19 hit, we transformed it again into a temporary "e-learning/ homeschool room" and added the rainbow chalkboard wall.
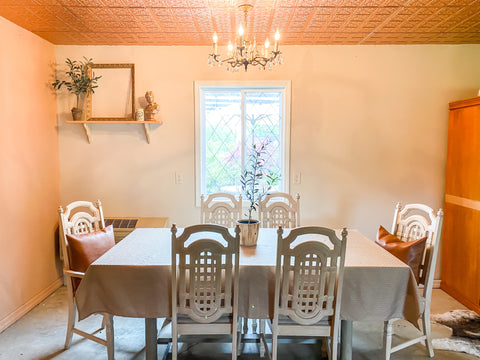
BEFORE

After visiting Tucson for our 8th anniversary, we were inspired to transform this space once again, but we were determined to make it both a livable and functioning area. I quickly started gathering ideas and came up with this inspiration board.

When I was putting together the design board for our bonus room, I kept coming back to the ceiling. We knew we would add paint, flooring and Southwest style decor, but with the room being so large the white ceiling felt plain and did not complement my overall design concept. As for the florescent lighting - my husband and I agreed - it had to go! Since we knew the existing lighting was changing anyway, I began to explore ways to add warmth and texture to the ceiling. Common and trendy methods to update boring ceilings are to use wood planks, beams or even bamboo. With our ceilings only being 8ft though, I didn't want anything to bulky. You guys know I LOVE copper and incorporate it into most of our designs. I had heard of copper ceilings and was intrigued by the idea, but wasn't sure if that was even an option for us.
After researching, I came across Ceilume. YOU GUYS!! I quickly discovered they offer easy to clean (waterproof!), Class A rated for fire safety, Greenguard Gold Certified for Indoor Air Quality, dust-free, mildew free, mold free, recyclable copper tiles! Not only all that, but their glue-up ceiling tiles claimed to be lightweight and easy to install - perfect for DIY'ers like us!
I shared our plans with Ceilume and the rest is history - we were a match made in heaven! They sent over a few sample copper tiles and we were sold. We selected their Fleur-de-lis Ceiling Tiles in copper with complementary decorative strips to hide the seams. They were the perfect option for us to incorporate a bit of France into the design.

We started the makeover process by removing several cabinets on the northeast wall as well as several other items I had been saving for a garage sale. Once we had a clean slate, we decided to start the makeover by painting the remaining cabinets, trim and walls.
Fun Fact: The vintage cabinets were actually the original ones to our home! They are in excellent condition and offer so much storage.
We used Fusion mineral paint to update the cabinets and window/door trim. For the walls, I selected Behr's Color of the Year "Canyon Dusk" for our feature wall and Adobe Sand for the other walls. Once we finished the paint, we got busy on installing the copper ceiling tiles! Below you can see the sample color story I was going for in the overall design. The cabinets were actually Bayberry and trim was Chocolate - both by Fusion Mineral Paint.

Once we were ready to install the copper ceiling tiles, we used the adhesive recommended by Ceilume. Since our ceilings were not flat, for extra reinforcement, we also opted to use a staple gun around the edges of the ceiling tiles which we knew would be covered by the decorative trim. In normal cases, the adhesive would be enough - we just have such a large space, we wanted ours to be overly secure.

Before starting, make sure your your walls are square. If not, make sure you keep tiles straight as you begin or the entire installation will be off. Once we got the first run of tiles installed, I could already see my vision coming to life! 
Our approximately 700 square foot ceiling took us about 8 hours to complete, but that was with a lot of breaks in between. Anytime you are working with a ceiling, it is strenuous on your neck/back so we actually did two half days. I would apply the adhesive to the tiles and hand them to my 6'5" husband (Mat) to install. It wasn't necessary, but for each tile, we both would work together and visually make sure everything was perfectly aligned before the staples were applied. I have an entire reel on Instagram stories saved if you would like to see a step-by-step video of the process (look for the Ceilume button). Thankfully, Mat is very handy and was able to remove the florescent lights as we went.
Pro Tip: We had previously met with an electrician who recommended removing all ceiling lighting, installing the copper tiles and then going back to add the new can lights, pendants and chandelier. After going through the entire process, we would highly recommend this as well! With all the lights removed, we were able to get in a great groove installing the tile to the bare ceiling and it went quickly.
 |
 |
Once the ceiling and lights were all installed, Mat built a new DIY wood countertop for our island. We had planned to purchase butcher's block, but once we saw how gorgeous the custom island countertop came out, we quickly changed our minds - plus we already had all the material on hand (double win)! Mat used the same process to make the DIY wood-style countertops for the remaining cabinets (blog post coming soon).

Didn't they turn out AMAZING? I love the mix of rustic vibes with our gorgeous copper ceiling!

Can you even believe this is the same space?? It's crazy what a little bit of hard work, paint and a new ceiling can do!!
|
|
|

We are so in love with our new moody, inviting space! My husband is using it as an office during the day and a music room at night. It has been the perfect setup for our family. Special thank you to Ceilume for working with us on this AMAZING project!

Sources:
- Cabinets - Fusion Mineral Paint (Bayberry)
- Windows/Trim - Fusion Mineral Paint (Chocolate)
- Feature Wall - Behr's Canyon Dusk
- Other Walls - Behr's Adobe Sand
- Copper Ceiling Tiles & Decorative Trim - Ceilume
- Pedant Lights - The Home Depot
- Cognac Pillows - Amazon
- Blinds - Daphnes by Select Blinds
- Runner - Target
- Chandelier - Vintage Find
- Barstools - Target
- Rug - Well Woven
- Guitar - Custom/Handmade
https://maisondemings.com/blogs/news/homemade-sugar-cookies?comment=136648229147#comments
https://maisondemings.com/blogs/news/chimichurri-bavette-with-grass-roots-farmers-cooperative?comment=136648261915#comments
https://maisondemings.com/blogs/news/trending-k-bowls?comment=136648294683#comments
https://maisondemings.com/blogs/news/copper-bakeware?comment=136648327451#comments
https://maisondemings.com/blogs/news/farm-shed-refresh?comment=136648360219#comments
https://maisondemings.com/blogs/news/flooring-install-with-lucida-surfaces?comment=136648392987#comments
https://maisondemings.com/blogs/news/raising-friendly-ducks?comment=136648425755#comments
https://maisondemings.com/blogs/news/handmade-moroccan-tile?comment=136648458523#comments
https://maisondemings.com/blogs/news/installing-faux-wood-beams?comment=136648491291#comments
https://maisondemings.com/blogs/news/mulch-landscaping?comment=136648524059#comments
https://maisondemings.com/blogs/news/viaggio-hardware?comment=136648556827#comments
https://maisondemings.com/blogs/news/ceilume-copper-tiles-2?comment=136648589595#comments
https://maisondemings.com/blogs/news/how-to-pull-off-artificial-outdoor-plants?comment=136648622363#comments
https://maisondemings.com/blogs/news/makeover-with-merola-tile?comment=136648655131#comments
https://maisondemings.com/blogs/news/spring-refresh-x-well-woven?comment=136648687899#comments
https://maisondemings.com/blogs/news/a-charming-french-inspired-barn?comment=136648720667#comments
https://maisondemings.com/blogs/news/tablescape-with-field-bouquet?comment=136648753435#comments
https://lvsshop.com/blogs/news/lip-tint-dari-merek-kecantikan-korea-yang-menarik-kenapa-memilih-romand-glasting-water-tint?comment=129957986364
https://lvsshop.com/blogs/news/review-romand-zerogram-matt-lipstick-dusty-pink-adorable-charisceleb?comment=129958019132#comments
https://lvsshop.com/blogs/news/round-lab-dokdo-toner-review-sensitive-skin-approved-m-review-98?comment=129958051900#comments
https://supportphone-number.co.uk/which-ludo-game-app-offers-the-best-online-multiplayer-experience/
https://articlepresswire.com/what-resources-are-needed-to-create-a-competitive-ludo-game/
https://www.charolottetimes46.com/what-is-the-best-gaming-for-india-and-ludo
https://www.southminneapolisnews.com/how-does-the-ludo-king-game-make-money
https://www.bipindianalopis.com/why-is-ludo-your-favourite-board-game
https://www.bipjacksonville.com/what-can-you-say-about-the-ludo-star-game
https://www.bipphoenix.com/what-are-some-good-online-ludo-pc-games
https://www.bipjobs.com/what-is-the-standard-size-of-the-ludo-board-game
https://www.neworleansnewsplus.com/why-is-ludo-the-most-famous-real-money-game
https://www.bipsanantonio.com/what-is-the-highest-level-in-the-game-of-ludo
https://www.bipmiamifl.com/what-are-the-top-five-ludo-game-apps
https://www.bipmemphis.com/what-are-the-top-five-ludo-game-apps-the-unconventional-future-forward
https://www.bippennsylvania.com/from-which-country-ludo-game-was-originated
https://www.bipillinois.com/from-which-country-ludo-game-was-originated-a-deeper-dive-into-its-ancient-roots-and-global-evolution
https://www.virginianewspress.com/can-you-help-me-in-the-ludo-game
https://www.bipdenver.com/which-ludo-game-is-the-best
https://www.thetulsatimes.com/how-many-people-play-the-ludo-game-online-in-india
https://www.theportlandtimes.com/which-ludo-game-gives-real-money
https://www.omahanewswire.com/does-ludo-game-give-real-money
https://www.baltimorebusinessdaily.com/what-is-the-ludo-real-cash-game-unpacking-the-digital-dice-and-dollar-dash
https://www.lasvegasnewsherald.com/what-is-the-ludo-real-cash-game
https://www.albuquerquenewstimes.com/what-is-indias-best-money-earning-ludo-game
https://www.baltimorenewswire.com/what-is-indias-best-money-earning-ludo-game
https://www.indianapolis24wire.com/what-is-indias-best-money-earning-ludo-game
https://www.fresnonewspost.com/where-can-i-play-a-free-ludo-game-and-win-money
https://www.denverviral.com/can-we-earn-money-by-playing-ludo
https://www.columbusnewstimes.com/how-many-players-can-play-the-online-ludo-game
https://www.phoenixnewsbuzz.com/what-are-the-steps-in-playing-ludo
https://www.bipfortworth.com/what-is-the-experience-of-playing-the-ludo-game
https://www.seattledailynewsanalysis.com/how-do-i-play-the-ludo-board-game
https://www.tucsonnewsplus.com/how-do-i-play-online-ludo-multiplayer-with-friends
https://www.sanfranciscodaily360.com/what-is-the-setting-for-the-ludo-game
https://laptoplifestyleads.com/user/profile/362701
https://app.waterrangers.ca/users/126840/about#about-anchor
https://www.grouvee.com/user/178070-Freeonlinegames/
https://referrallist.com/profile/games-live-play/
https://www.outdooractive.com/en/member/games-live-play/320279392/
https://eatradingacademy.com/forums/users/freeonlinegames/
https://vnbit.org/members/freeonlinegames.64739/#about
https://kuntal.org/kuntal/profile/gamesliveplayin
https://doc.chainsight.com/discuss/686ca8c55b93d3001e6eaf0f
https://www.bipamerican.com/profile/gamesonlinefree
https://www.neworleansnewsplus.com/profile/freeonlinegames
https://www.londonexplorers.com/profile/gamesonlinefree
https://www.prbusinesswires.com/profile/gamesonlinefree
https://forum.elecrow.com/profile/Gamesliveplay
https://polyamour.be/forums/users/Gamesonlinefree/
https://rybolovnorsko.cz/forums/users/playfreegamesonline/
https://wiki.goframe.org/display/gfarticle/gamesonlinefree
https://www.buzzakoo.com/Freeonlinegames
https://www.spacedesk.net/support-forum/profile/Freeonlinegames/
https://medianewsfire.com/dashboard/author.php?username=freeonlinegames
https://www.philadelphialivenews.com/profile/freeonlinegames
https://www.mioola.com/Gamesonlinefree/
https://nancycain.com/author/Gamesonlinefree/
https://www.francewow.com/profile/freeonlinegames
https://www.inc91.com/profile/freeonlinegames
https://4lomza.pl/forum/profile.php?f=0&id=263597
https://www.thejobnetwork.com/organization/gaming
https://wettbewerb2017.wir-tun-was-fuer-bienen.de/user/freeonlinegames/
https://www.compliancecalendar.in/freeonlinegames
https://stratos-ad.com/forums/index.php?action=profile;area=summary;u=66841
https://www.prpnewswire.com/profile/gamesonlinefree
https://orusocial.com/Freeonlinegames
https://viewstub.com/profile/gamesliveplay1
https://toirscript.com/user/gamesliveplay
https://screeningroom.org/community/users/686ce5427ebeee0002e6a2da
https://scioly.org/forums/memberlist.php?mode=viewprofile&u=159057
https://leetcode.com/u/gamesliveplay/
https://farmterest.com/user/22391/gamesliveplay
https://www.reddit.com/user/gamesliveplay/
https://www.snibc.co.uk/fusion/profile.php?lookup=8372
https://www.openlibhums.org/profile/e115cb22-9063-4677-94b0-bba22b871a4a/
https://user.linkdata.org/user/Games_Play/work
https://tutorialslink.com/member/GamesPlay/64503
https://marylandentrepreneurhub.com/user-profile/1751970932625×460418410340830660
https://scotjobsnet.co.uk/candidate/gamesliveplay-in/
https://mikropragmata.lifo.gr/meli/48407/
https://shareresearch.us/profile/gamesonlinefree
https://beforeitsnews.com/v3/contributor/bio/?uid=1017046
https://nationaldppcsc.cdc.gov/s/profile/005SJ00000UQU2nYAH
https://www.naaonline.org/gamesonlinefree
https://moodle3.appi.pt/user/profile.php?id=222660
https://www.aprofitableday.com/directory-business_lis/listing/where-can-i-play-free-online-games/
https://directory9.net/profile/games-live-play/
https://www.pozible.com/profile/games-live-play/community
https://www.citymapia.com/bhopal/games-online-free
https://review.gymbuddynow.com/play-free-games-online/
https://www.youdriver.com/en/play-free-games-online-147373/
https://www.protenders.com/companies/gaming
https://www.insidelouisville.com/mumbai/sports/games-live-play
https://arounduniversity.lpru.ac.th/index.php/topic,108586.new.htmlhttps://www.bipamerican.com/are-you-looking-for-more-great-free-online-games-for-groups
https://www.neworleansnewsplus.com/where-can-i-play-free-online-games
https://www.londonexplorers.com/what-is-the-best-online-free-game-at-the-moment
https://www.prbusinesswires.com/what-are-some-fun-free-online-games
https://www.bippressrelease.com/what-are-some-fun-and-stupid-games-to-play-with-friends
https://www.francewow.com/play-free-games-online-without-downloading
https://www.prpnewswire.com/what-are-some-fun-games-to-play-with-friends-without-spending-any-money-2276
https://iseodirectory.com/listings13239061/play-free-online-games-to-earn-money
https://isitedirectory.com/listings13260519/play-free-online-games-to-earn-money-without-investment
https://webdirectory7.com/listings13241980/play-free-online-games-for-girls
https://webdirectoryone.com/listings13248616/play-free-online-games-to-earn-money-download
https://webdirectorytalk.com/listings784800/play-free-online-games-to-earn-money-app
https://webnamedirectory.com/listings13242070/play-free-online-games-for-pc
https://webtagdirectory.com/listings13241266/play-free-online-games-to-earn-money-in-india
https://webtalkdirectory.com/listings13259519/play-free-online-games-to-earn-money
https://webtechdirectory.com/listings13247288/spider-solitaire-play-free-online-games
https://whatisadirectory.com/listings13281768/play-now-free-online-games
https://wodirectory.com/listings13268021/play-best-free-online-games
https://worlds-directory.com/listings13587415/best-free-online-games-for-kids
https://wow-directory.com/listings786312/best-free-online-games-for-girls
https://wwndirectory.com/listings786393/best-free-online-games-no-download
https://yeepdirectory.com/listings13257976/best-free-online-games-pc
https://your-directory.com/listings13590434/best-free-online-games-to-play-with-friends
https://vip-directory.com/listings13247349/best-free-online-games
https://vital-directory.com/listings13248349/best-free-online-games-for-seniors
https://weballdirectorys.com/listings771381/best-free-online-games-for-adults
https://mondaydirectory.com/listings13244863/play-free-games-online-without-downloading
https://large-directory.com/listings13241955/play-free-games-online-without-downloading-for-kids
https://leedirectory.com/listings13256702/play-free-games-online-without-downloading-with-friends
https://legit-directory.com/listings13582214/play-free-games-online-without-downloading-free-fire
https://lifesdirectory.com/listings13253427/play-free-games-online-without-downloading-for-girls
https://limawebdirectory.com/listings813565/play-free-games-online-without-downloading-pc
https://linkdirectorynet.com/listings13244079/play-free-online-games-to-earn-money
https://links2directory.com/listings13247538/play-free-online-games-to-earn-money-without-investment
https://listedirectory.com/listings786315/best-free-online-games
https://lombok-directory.com/listings13240887/best-free-online-games-for-kids
https://lovelydirectory.com/listings780735/best-free-online-games-pc
https://magnetdirectory.com/listings13240479/best-free-online-games-to-play-with-friends
https://tools-directory.com/listings762562/games-live-play
https://topazdirectory.com/listings13232169/games-live-play
https://topdirectory1.com/listings13256361/games-live-play
https://tops-directory.com/listings13255677/games-live-play
https://triplexdirectory.com/listings13247268/games-live-play
https://ukdirectorylist.com/listings13241230/play-online-cards
https://ukdirectoryof.com/listings13277113/free-online-games
https://morningdirectory.com/listings787556/play-free-games-online
https://mpowerdirectory.com/listings796310/games-live-play
https://mydirectorys.com/listings13248857/play-online-ludo
https://myindexdirectory.com/listings801817/ludo-games-online-free
https://mynichedirectory.com/listings13245601/games-live-play
https://nebula-directory.com/listings792009/games-live-play
https://nerodirectory.com/listings13246970/games-live-play
https://netwebdirectory.com/listings13246440/games-live-play
https://usanetdirectory.com/listings13253308/games-live-play
https://victordirectory.com/listings781165/games-live-play
https://victorydirectory.com/listings808899/games-live-play
https://viewsdirectory.com/listings13241692/games-live-play
https://directoryrec.com/listings793561/games-live-play
https://directoryrelt.com/listings822896/games-live-play
https://directoryserp.com/listings13266580/games-live-play
https://directorystumble.com/listings783759/games-live-play
https://directorytome.com/listings13257542/games-live-play
https://directoryunit.com/listings13243722/games-live-play
https://directoryweburl.com/listings13246887/games-live-play
https://directorywidzard.com/listings13251598/games-live-play
https://1-webdirectory.com/listings13248011/games-live-play
https://123-directory.com/listings13248023/games-live-play
https://1stlinkdirectory.com/listings13250983/games-live-play
https://directoryreactor.com/listings13243758/games-live-play
https://directoryfrenzy.com/listings13181260/games-live-play
https://directoryglobals.com/listings13245470/games-live-play
https://directoryhand.com/listings13246517/games-live-play
https://directoryhere.com/listings783049/games-live-play
https://directoryholiday.com/listings13581360/games-live-play
https://directoryindexer.com/listings13243093/games-live-play
https://directoryio.com/listings1078780/games-live-play
https://directorylandia.com/listings779159/games-live-play
https://directorylinks2u.com/listings13240984/games-live-play
https://directoryorg.com/listings13253733/games-live-play
https://directorypile.com/listings13241587/games-live-play
https://directorypixels.com/listings13276261/games-live-play
https://directoryprice.com/listings763532/games-live-play
https://directoryquick.com/listings13247373/games-live-play
https://directoryforrank.com/listings13251124/games-live-play
https://directory-boom.com/listings13310102/games-live-play
https://directory-broker.com/listings13248790/games-live-play
https://directory-cube.com/listings13243587/games-live-play
https://directory-daddy.com/listings13247807/games-live-play
https://directory-empire.com/listings13271419/games-live-play
https://directory-engine.com/listings13244355/games-live-play
https://directory-expert.com/listings13234585/games-live-play
https://directory-farm.com/listings13249924/games-live-play
https://directory-fast.com/listings1077527/games-live-play
https://directory-legit.com/listings13250528/games-live-play
https://directory-nation.com/listings13586754/games-live-play
https://directory-url.com/listings13263673/games-live-play
https://directory-webs.com/listings13238412/games-live-play
https://directory4search.com/listings13250605/games-live-play
https://directory4web.com/listings13247962/games-live-play
https://directoryalbum.com/listings13279596/games-live-play
https://directoryark.com/listings13240152/games-live-play
https://directorydepo.com/listings788698/games-live-play
https://directoryarmy.com/listings13244933/games-live-play
https://directoryecho.com/listings812060/games-live-play
https://directoryethics.com/listings13256561/games-live-play
https://directoryforever.com/listings13242033/games-live-play
https://directory-store.com/listings13240588/games-live-play